ShopDreamUp AI ArtDreamUp
Deviation Actions


Suggested Deviants


Suggested Collections


You Might Like…


Featured in Groups

Description
This is the first part of a paper sculpting tutorial I’ve had planned for some time now. I have the other sections mapped out in my head, but I’m running into some logistical issues that I haven’t quite worked out yet.
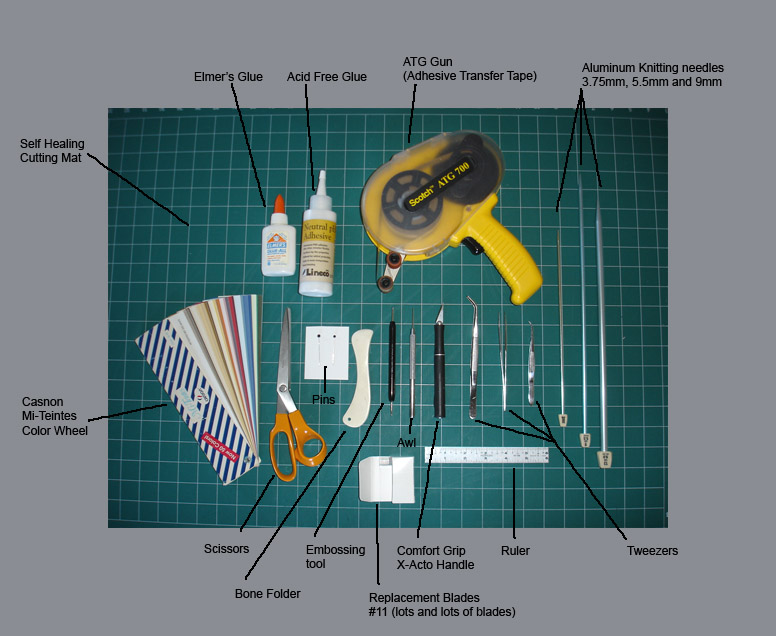
I feel it necessary to point out that the tutorials I have planned will explain the way *I work, not the only way to paper sculpt. As such, the picture above shows some of the tools I use. I didn’t include all the tools I have, as they aren’t all necessary, but the tools I use most frequently are:
X-acto knife with a comfort grip handle and #11 blades replacement blades: I’ve tried a number of different handles and blades, but these work best for me. I strongly recommend the comfort grip handle, it helps keep your hands from cramping if your grip is too tight.
Self-healing cutting mat: The mat I have is very large, 24”x36”. I’ve worked on smaller, but this size covers most of my desk. I’ve also had different color mats and prefer the green mat because all paper colors are easy to see on its surface.
Aluminum knitting needles: I use three sizes: 3.75mm, 5.5mm and 9mm. These are used to shape paper after it is cut.
Glue: Methyl cellulose acid free glue is best for long term preservation of your piece, but plain white Elmer’s glue is great for beginning projects (plus it’s cheap).
Common pins: I use pins to apply glue to paper after it has been cut and shaped. I like the kind of pin with a ball on the end rather than a flat head. They are easier to pick up.
Tweezers: I have three different sizes. I tend to use the needle nosed pair the most.
The tools above are necessary for the way I work. Other tools that are helpful, but not critical:
ATG Gun: Adhesive Transfer tape is incredibly handy. It is like double sided tape without the plastic tape center. It is just the glue. I use it to temporarily hold layers of paper together when I cut out specific pieces of a sculpture. I will show this in future tutorials.
Scissors: These are probably my least used tool. I use them to trim down large pieces of paper into more manageable sizes
Bone folder: Great for embossing lines and creasing folds.
Embossing tool (or burnisher): I use this to shape very small pieces of paper, like irises, pupils and eye highlights. It is also good for creating texture on the surface of paper.
Awl: Used for making textures. I also use the fine point tip to pick up small pieces of paper.
Metal ruler: I have multiple rulers, but use the cork backed 6” & 12” the most.
Canson Mi-Teintes Color Wheel: Again, not critical, but it has been invaluable to me. I got this at an art supply store (living near a world known art school has its advantages) and use it all the time to plan colors for my projects. This one is a little out of date as they have introduced some new colors, but it is very handy.
Image size
776x636px 143.33 KB
Make
SONY
Model
DSC-P100
Shutter Speed
10/400 second
Aperture
F/2.8
Focal Length
8 mm
ISO Speed
100
Date Taken
Mar 12, 2011, 1:50:36 PM
© 2011 - 2024 paperfetish
Comments26
Join the community to add your comment. Already a deviant? Log In
Can you please post the complete tutorial?thank you